How To Make Healthy Homemade Dog Food With Beef
You know what’s wild? Most of us obsess over our own meal prep but throw whatever’s on sale into our dog’s bowl without a second thought.
I started making homemade dog food for my pup after realizing I couldn’t pronounce half the ingredients in commercial brands.
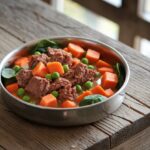
This beef-based recipe changed everything – better energy, shinier coat, and actual excitement at mealtime. Let me show you exactly how to make it.
What Makes This Recipe Awesome

This isn’t just throwing some ground beef in a bowl and calling it a day. This recipe combines quality protein with vegetables, healthy carbs, and essential nutrients to create a balanced meal that actually supports your dog’s health.
Here’s why it works:
- Lean ground beef provides essential amino acids for muscle maintenance
- Whole vegetables deliver vitamins and fiber
- Brown rice and oats offer sustained energy
- You control every single ingredient (no mystery meat or fillers)
The best part? Many dogs with food sensitivities do way better on homemade diets where you know exactly what’s going in. Plus, your dog will actually look forward to mealtime instead of just tolerating it.
Real talk: This recipe is nutritionally balanced for most adult dogs, but you absolutely need to consult with your vet before making the switch, especially if your dog has specific health conditions.
Ingredients
This batch makes approximately 12-15 cups of dog food. Adjust portions based on your dog’s size and activity level.

Protein:
- 2.5 pounds lean ground beef (80/20 or 85/15 works great)
Carbohydrates:
- 2 cups brown rice (uncooked)
- 1 cup rolled oats
Vegetables:
- 1 cup carrots, finely chopped or grated
- 1 cup green beans, chopped
- 1 cup sweet potato, diced
- 1/2 cup peas (fresh or frozen both work)
- 1/2 cup spinach, chopped
Supplements & Add-ins:
- 2 tablespoons olive oil or fish oil
- 1 teaspoon ground eggshell powder (for calcium—super important)
- 1/2 teaspoon salt (optional, use sparingly)
Highly recommended:
- Canine multivitamin (follow package directions for your dog’s weight)
Instructions
Step 1: Prep Your Ingredients
Chop all your vegetables into small, manageable pieces. Your dog isn’t going to sit there and chew like a human, so smaller is better. I usually aim for pieces about the size of a pea or smaller.
Grate or finely chop the carrots—this helps with digestion. Dice the sweet potato into small cubes so they cook evenly.
Step 2: Cook the Rice and Oats
Combine the brown rice and rolled oats in a large pot with 5 cups of water. Bring to a boil, then reduce heat and simmer for about 40-45 minutes until the grains are fully cooked and tender.
The oats will get mushy—that’s exactly what you want. Let this cool slightly while you handle the rest.
Step 3: Brown the Beef
In a large skillet or pot, cook the ground beef over medium heat. Break it up into small crumbles as it cooks. You want it fully browned with no pink remaining.
Don’t drain the fat completely—some of that fat provides necessary calories and makes the food more palatable. Just drain off any excessive amount.
Step 4: Cook the Vegetables
Add all your chopped vegetables to the cooked beef. Stir everything together and cook for another 10-15 minutes until the vegetables are tender.
The sweet potato should be soft enough to pierce easily with a fork. Green beans should be tender but not mushy. Everything should be well-incorporated.

Step 5: Combine Everything
In your largest pot or bowl, combine the cooked beef and vegetables with the rice and oat mixture. Mix thoroughly—you want an even distribution of ingredients throughout.
Add the olive oil or fish oil and mix again. This adds healthy fats and makes the food more appealing to your dog.
Step 6: Add Supplements
Once the mixture has cooled to room temperature, add the ground eggshell powder and any other supplements like a canine multivitamin.
Mix everything one final time to ensure even distribution. The eggshell powder is crucial for calcium—don’t skip this step.
Step 7: Portion and Store
Let the food cool completely before portioning. I use a large measuring cup to scoop portions into individual containers or freezer bags.
Store what you’ll use within 3-4 days in the refrigerator. Freeze the rest in single-serving portions for easy thawing.

Feeding Guidelines
Small dogs (up to 20 lbs): 1/2 to 1 cup per day, split into two meals
Medium dogs (20-50 lbs): 1 to 2 cups per day, split into two meals
Large dogs (50-100 lbs): 2 to 4 cups per day, split into two meals
Extra-large dogs (100+ lbs): 4+ cups per day, split into two meals
These are general guidelines. Your dog’s actual needs depend on age, activity level, and metabolism. Monitor their weight and adjust accordingly. IMO, it’s better to start with slightly less and increase if needed.
Benefits of This Homemade Recipe
Better Digestion
Real, whole ingredients are easier for dogs to digest than heavily processed kibble. You’ll probably notice more consistent poops (yeah, I went there) and less gas.
Improved Coat and Skin
The omega fatty acids from the oil plus the quality protein make a noticeable difference. Expect a shinier coat and healthier skin within a few weeks.
Increased Energy
Quality nutrition = better energy levels. My dog went from lazy afternoon naps to actually wanting to play after switching to homemade food.
Weight Management
You control portions and ingredients, making it easier to maintain a healthy weight. No hidden fillers or excessive calories.
Allergy Management
If your dog has food sensitivities, this recipe lets you identify and eliminate problem ingredients. You can easily swap out components based on your dog’s specific needs.

Frequently Asked Questions
Can I use a different protein source?
Absolutely. Ground turkey, chicken, or even fish work great. Just maintain the same protein-to-carb-to-vegetable ratios. Some dogs do better with different proteins, so feel free to experiment.
Do I really need the eggshell powder?
Yes. Calcium is essential for bone health, and without it, this recipe would be deficient. You can also use a calcium supplement designed for dogs if you prefer.
Can puppies eat this?
Puppies have different nutritional needs than adult dogs, particularly higher calcium and phosphorus requirements. This recipe isn’t formulated for puppies—consult your vet for puppy-specific recipes.
How long does this food last?
In the fridge: 3-4 days. In the freezer: up to 3 months. I freeze individual portions and thaw them the night before in the fridge.
Is this cheaper than commercial dog food?
It depends on your location and ingredient costs. For me, it’s about the same price as premium kibble but way cheaper than high-end canned food. The health benefits make it worth it regardless.
Can I prep this in bulk?
Definitely. I usually make a double batch and freeze most of it. Just make sure you’re storing it properly in airtight containers or freezer bags.
What vegetables should I avoid?
Never use onions, garlic, grapes, raisins, or avocado—these are toxic to dogs. Stick to dog-safe vegetables like the ones listed in this recipe.
Do I need to add vitamins?
A canine multivitamin is highly recommended to ensure your dog gets all necessary micronutrients. Whole food alone might not provide everything in the right amounts.
Final Thoughts
Making homemade dog food takes more effort than opening a bag of kibble, but the benefits are worth it. You know exactly what your dog is eating, you can customize based on their needs, and honestly? The tail wags at mealtime are pretty rewarding.
Start slowly when transitioning—mix this homemade food with their current food over 7-10 days to avoid digestive upset. Monitor their energy, weight, and overall health. And seriously, work with your vet to make sure this approach works for your specific dog.
Your dog trusts you to make good choices for their health. This recipe is a solid starting point for providing quality nutrition that supports a long, healthy life. Plus, the look on their face when they realize dinner is actually delicious? Priceless 🙂
Printable Recipe Card
Want just the essential recipe details without scrolling through the article? Get our printable recipe card with just the ingredients and instructions.

I’ve spent 10+ years in dog training, digging into what makes dogs (and their humans) tick. At Smart Dog Learning, I share my no-nonsense, fun approach to training so you can enjoy life with a well-behaved, happy pup—no boring lectures, just practical results 😉