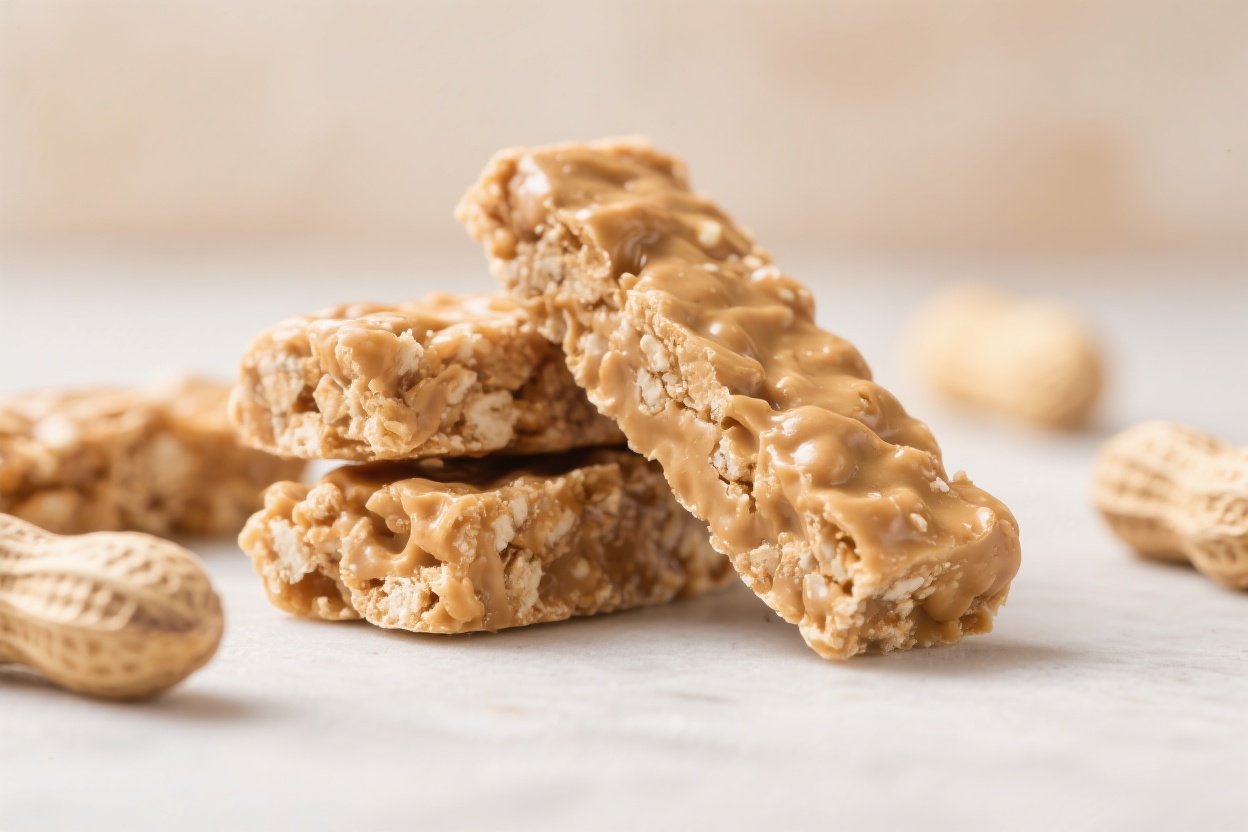
Peanut Butter Snack Bars for Dogs: Simple & Storage-Friendly
If you like keeping homemade treats on hand for your dog, these peanut butter snack bars make it easy. They’re quick to mix, bake into sturdy bars, and hold up well in the pantry or freezer. The ingredients are straightforward and dog-safe, with no fancy steps or special tools required.
You’ll get a batch that’s perfect for daily rewards or on-the-go snacks. Best of all, you can customize them a bit to match your dog’s taste and dietary needs.
Why This Recipe Works
These bars rely on pantry staples and a simple method that creates a firm, sliceable texture. Rolled oats and whole wheat flour add structure and fiber without getting crumbly. Peanut butter and egg bind everything and bring in healthy fats and protein. A touch of unsweetened applesauce adds moisture, so the bars bake up tender but not sticky.
The result is a treat that’s easy to portion, easy to store, and easy on most dogs’ stomachs.
What You’ll Need
- 1 cup natural, unsalted peanut butter (check the label to ensure it does not contain xylitol)
- 1 1/2 cups rolled oats (old-fashioned oats, not instant)
- 1 cup whole wheat flour (or oat flour for a gentler option)
- 1 large egg
- 1/2 cup unsweetened applesauce
- 2–4 tablespoons water (as needed to bring dough together)
- Optional add-ins: 1 tablespoon ground flaxseed, 2 tablespoons unsweetened shredded coconut, or 2 tablespoons pumpkin puree
- Equipment: Mixing bowl, spoon, parchment paper, 8×8-inch baking pan (or similar), knife, and cooling rack
Step-by-Step Instructions
- Preheat and prepare: Heat your oven to 325°F (165°C). Line an 8×8-inch pan with parchment paper, leaving a little overhang for easy lifting.
- Mix the wet ingredients: In a large bowl, stir together peanut butter, egg, and applesauce until smooth. If the peanut butter is very thick, microwave it for 10–15 seconds to loosen.
- Add the dry ingredients: Stir in rolled oats and flour.
The mixture will be thick. If it’s crumbly, add water 1 tablespoon at a time until it presses together like a firm cookie dough.
- Press into the pan: Transfer the dough to the prepared pan. Use a spatula or damp hands to press it evenly into the corners.
Aim for a level surface so the bars bake uniformly.
- Score for easy slicing (optional): Use a knife to lightly score lines where you’ll later cut the bars. This helps guide clean cuts without crumbling.
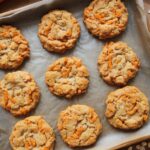
- Bake: Bake for 22–28 minutes, until the edges are set and the top looks dry and slightly golden. The bars should feel firm to the touch.
- Cool completely: Lift the slab out by the parchment and place it on a rack.
Let it cool fully before cutting. This step prevents breaking and helps the bars firm up.
- Slice and portion: Cut into small bars or bite-size squares, sized for your dog. For most dogs, 1–2 small squares is a sensible treat portion.
How to Store
- Room temperature: Store in an airtight container for up to 5 days.
Add a small piece of parchment between layers to prevent sticking.
- Refrigerator: Keeps well for 10–12 days. This is a good option if your kitchen is warm or humid.
- Freezer: Freeze in a single layer, then move to a freezer bag. Label and date.
They stay fresh for up to 3 months. Thaw overnight in the fridge or at room temperature for 20–30 minutes.
- On the go: Pack a few bars in a small silicone bag or container. Avoid leaving them in a hot car; high heat can make oils separate and affect texture.
Why This is Good for You
Homemade dog treats give you control over ingredients and portions.
You skip unnecessary salt, sugars, and preservatives found in many store-bought options. These bars also help strengthen your routine: making a batch means you always have a consistent reward on hand for training, walks, or grooming sessions. Plus, baking for your dog can be a budget-friendly way to keep treats available without last-minute trips to the pet store.
What Not to Do
- Don’t use peanut butter with xylitol. It’s highly toxic to dogs.
Read the label carefully.
- Don’t add chocolate, raisins, or sweeteners. These are unsafe or unnecessary for dogs.
- Don’t oversize the portions. Even healthy treats add calories. Keep pieces small, especially for small breeds or dogs watching their weight.
- Don’t skip cooling time. Cutting too soon can cause crumbly edges and uneven portions.
- Don’t assume all dogs tolerate wheat. If your dog has sensitivities, choose oat flour instead of whole wheat flour.
Recipe Variations
- Grain-friendly but gentler: Replace whole wheat flour with oat flour for a softer bite. You can blitz rolled oats in a blender to make your own.
- Pumpkin boost: Swap half the applesauce for pumpkin puree (unsweetened).
It adds fiber and a mild flavor many dogs love.
- Extra crunch: Stir in 2 tablespoons unsweetened shredded coconut or 1 tablespoon ground flaxseed.
- No-bake option: Mix the dough, press it thin, and dehydrate at low heat (170–200°F / 75–95°C) for 2–3 hours until firm and dry. Store as you would baked bars.
- Training bites: Roll the dough thinner and bake a few minutes less. Cut into tiny squares for quick, low-calorie rewards.
FAQ
Can I use crunchy peanut butter?
Yes.
Crunchy peanut butter works fine and adds texture. Just make sure the label lists only peanuts (and maybe salt) and confirms no xylitol.
What if my dog is sensitive to wheat?
Use oat flour instead of whole wheat flour. You can make it by blending rolled oats into a fine meal.
You may need a tablespoon or two less water, as oat flour can hold more moisture.
How many bars can my dog have per day?
As a general rule, keep treats to 10% or less of your dog’s daily calories. For many medium dogs, 1–2 small pieces per day is plenty. Adjust for your dog’s size, activity level, and vet’s guidance.
Can I add banana?
Yes, a small mashed ripe banana can replace some or all of the applesauce.
Keep the total moisture similar so the dough stays firm enough to press and slice.
Do I need to refrigerate them?
Not immediately, but refrigeration extends freshness and helps maintain texture, especially in warm climates. If you won’t use them within 5 days, refrigerate or freeze.
My bars turned out dry. What happened?
They may have baked a bit too long, or the dough was too dry.
Next time, add water a tablespoon at a time until the dough holds together and check doneness early. Slightly underbaking by 1–2 minutes can help keep them softer.
Are these safe for puppies?
Generally, yes for puppies over 8–10 weeks who tolerate the ingredients. Keep pieces very small and introduce new foods gradually.
When in doubt, ask your vet, especially for very young or sensitive pups.
Can I use almond or other nut butters?
Plain almond butter is usually safe in small amounts, but peanut butter is more universally tolerated and affordable. Avoid any nut butter with added sweeteners, seasonings, or xylitol.
Can I make them gluten-free?
Yes. Use certified gluten-free oats and oat flour.
The texture will be slightly softer but still sliceable and storage-friendly.
How do I make them extra crunchy?
After the initial bake, reduce the oven to 250°F (120°C). Slice the slab into bars and return them to the oven on a sheet pan for 20–30 minutes to dry slightly. Cool completely before storing.
Wrapping Up
These peanut butter snack bars are simple to make, easy to store, and a hit with most dogs.
With a short ingredient list and flexible variations, you can keep a batch on hand without fuss. Measure, mix, bake, and you’ve got handy squares ready for walks, training, or just-because moments. Keep portions small, store them well, and enjoy the convenience of homemade treats you can feel good about.
Your dog will let you know you’re on the right track with every happy crunch.
Printable Recipe Card
Want just the essential recipe details without scrolling through the article? Get our printable recipe card with just the ingredients and instructions.

I’ve spent 10+ years in dog training, digging into what makes dogs (and their humans) tick. At Smart Dog Learning, I share my no-nonsense, fun approach to training so you can enjoy life with a well-behaved, happy pup—no boring lectures, just practical results 😉